
前回[Laravel11+LIVEWIRE #1]とりあえず試してみる(Installation)でインストールして画面表示までやってみた。
今回は公式のコンポーネント(Components)をやっていく。
参考)https://livewire.laravel.com/docs/components
コンポーネントとは
コンポーネントは、Livewire アプリケーションの構成要素です。状態と動作を組み合わせて、フロントエンド用に再利用可能な UI を作成します。
準備
公式を読んでいると途中からpostsテーブルを使うので、テーブルとモデルを作る。-mをつけるとモデルを作ったあとにマイグレーションファイルも作るので楽ちん。
% php artisan make:model Post -m

   INFO  Model [app/Models/Post.php] created successfully.

   INFO  Migration [database/migrations/2024_09_04_030032_create_posts_table.php] created successfully.
database/migrations/2024_09_04_030032_create_posts_table.php
    public function up(): void
    {
        Schema::create('posts', function (Blueprint $table) {
            $table->id();

            $table->integer('user_id');
            $table->string('title')->nullable();
            $table->string('message')->nullable();

            $table->timestamps();
        });
    }
マイグレーション実行
% php artisan migrateテーブルが出来上がるので、ダミーデータを適当にいれる。

一覧表示してみる
コンポーネント作成
% php artisan make:livewire CreatePost
 COMPONENT CREATED  🤙

CLASS: app/Livewire/CreatePost.php
VIEW:  resources/views/livewire/create-post.blade.php
routes/web.php
use App\Livewire\CreatePost;

Route::get('/posts', CreatePost::class);
app/Livewire/CreatePost.php
<?php

namespace App\Livewire;

use App\Models\Post;

use Livewire\Component;

class CreatePost extends Component
{
    public $title = 'Post title...';
    public $posts;

    public function render()
    {
        $this->posts = Post::all();
        return view('livewire.create-post');
    }
}
resources/views/livewire/create-post.blade.php
<div>
    <h1>Title: "{{ $title }}"</h1>
    @foreach ($posts as $post)
        <div wire:key="{{ $post->id }}">{{ $post->title }}</div>
    @endforeach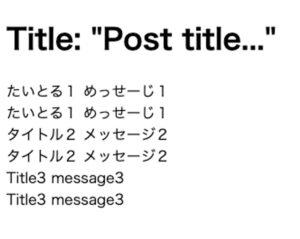
</div>ブラウザでhttp://localhost/livewire_study/postsにアクセスすると以下の表示になり、DBから値が取得できることがわかる。

行はコンポーネントで取り込んで表示したいから、コンポーネントを作る。
% php artisan make:livewire PostItem
 COMPONENT CREATED  🤙

CLASS: app/Livewire/PostItem.php
VIEW:  resources/views/livewire/post-item.blade.php
app/Livewire/PostItem.php
<?php

namespace App\Livewire;

use Livewire\Component;

class PostItem extends Component
{
    public $post;

    public function render()
    {
        return view('livewire.post-item');
    }
}
resources/views/livewire/post-item.blade.php
<div>
    <h1>Title: "{{ $title }}"</h1>
    @foreach ($posts as $post)
        <livewire:post-item :$post :key="$post->id">

        @livewire(PostItem::class, ['post' => $post], key($post->id))

        {{--<div wire:key="{{ $post->id }}">{{ $post->title }}</div>--}}
    @endforeach
</div>
外部コンポーネントを取り込むときは、2種類の書き方があるってことだけど、どっちがいいのだろうか…
ブラウザで表示するとこんな感じ
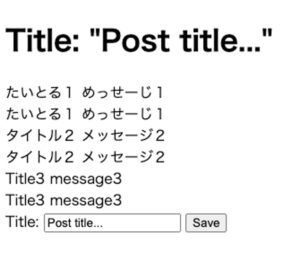
登録フォームを作る
resources/views/livewire/create-post.blade.php
        :
        :
    @endforeach

    <form wire:submit="save">
        <label for="title">Title:</label>

        <input type="text" id="title" wire:model="title">

        <button type="submit">Save</button>
    </form>
    {{ session('status') }}
</div>
app/Livewire/CreatePost.php
    public function save()
    {
        $post = new Post();
        $post->user_id = 1;
        $post->title = $this->title;
        $post->save();

        return redirect()->to('/posts')
             ->with('status', 'Post created!');
    }
ブラウザで表示するとこんな感じ。
タイトルは適当に入力してSaveボタンを押すと、エラー…
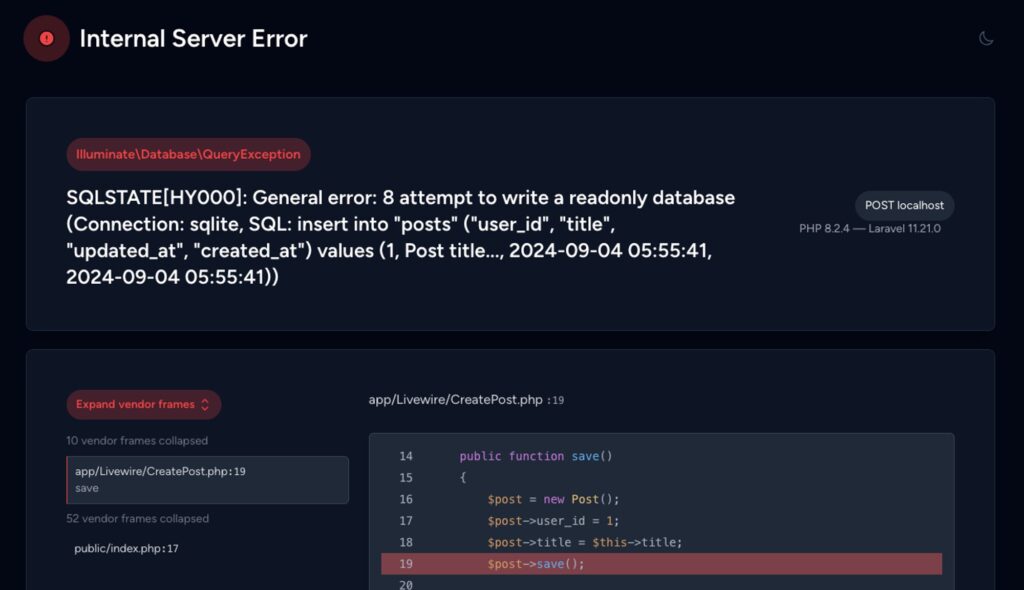
sqliteファイルのパーミッションかな…なので権限を与える。
% sudo chmod 777 database
% sudo chmod 666 database/database.sqlite
sqliteファイルだけでなく、databaseフォルダにも権限がないとエラーは解消されないのでご注意!
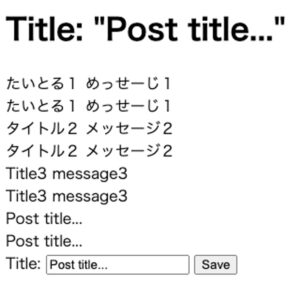
再度Saveボタンを押すとデータが登録される。
公式には他にもいろいろと書いてあるけど、やり方の話がいろいろと書いてある話なので省略する。
感想
データ登録する時はバリデーションいるでしょ?そもそもPOSTで送らないといけないのにGETで送ってるよね?データ登録したらリダイレクトなん?このあたりのやり方を学んでいかないとね!
コメント